Print
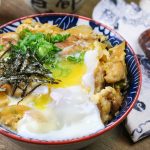
Oyakodon (親子丼) Japanese Chicken and Egg Rice Bowl
A classic Japanese dish made with chicken and egg, simmered in a sweetened soy-dashi broth served over a warm bed of rice.
Prep 5 minutes
Cook 15 minutes
Total 20 minutes
Yields 2 servings
Ingredients
Dashi Flavouring (makes 1 ¼ cup)
- 1 cup dashi broth (1 cup water + 1 teaspoon dashi powder)
- 1 tablespoon sake
- 1 tablespoon mirin
- 2 ½ tablespoons soy sauce optional gluten-free
- Pinch (1/8 teaspoon) white sugar optional
Main Ingredients
- 1/2 medium (240 grams) yellow onion cut into thin ¼ inch wedges
- 400 grams boneless, skinless chicken thighs (4 thighs) cut into 1 inch cubes
- 4 large eggs lightly beaten
- 2 reasonable portions of rice warmed
Garnish
- 2 onsen tamago optional (soft poach or raw egg yolk)
- mitsuba optional
- green onion thinly sliced
- ¼ nori sheet cut into thin strips with scissors
- shichimi togarashi (seven spice blend) optional
Optional Add-ins
- 1 cup (60 grams) Asian mushrooms such as shiitake, shimeji, enoki, etc., sliced
- 1/2 cup (30 grams) carrots julienne
- 150 grams silken tofu (half package) small cubes
Instructions
-
To make the dashi flavouring: In a 2 cup measuring cup, combine dashi broth, sake, mirin, soy sauce, and sugar. Mix to combine.
-
To make the oyakodon: Heat a small frying pan over medium-high heat and add half of the dashi flavouring to the pan, along with half of the onions. Cover and simmer for 8 to 10 minutes until onions are softened. (Note: If you want to any of the Optional Add-ins, add half of them in at the 5 minute mark.Cover the pan and cook for 3 to 5 minutes.)
-
Reduce to medium-low, uncover the pan and add half of the chicken. Cook covered for an additional 8 to 10 minutes, until the chicken is cooked through. If needed add a tablespoon of water to ensure the level of liquid is maintained.
-
Reduce to low, uncover and add half of the beaten eggs. Spread the egg throughout the pan, cover and cook for 1 to 2 minutes until the eggs are almost set but still runny.
-
Using chopsticks or a rubber spatula, run the utensil around the frying pan to loosen the egg. Pour the chicken and egg over the steamed rice.
-
Garnish with 1 onsen tamago (optional), mitsuba (optional), green onions, nori strips, shichimi togarashi (optional).
-
Repeat steps 2 to 6 for the other portion.
-
Enjoy!
Recipe Notes
- Oyakodon is typically made one portion at a time, I suggest using 2 small frying pans to cook at the same time. The reason for this is to retain the circular shape once the egg has set. This allows for nice presentation when transferring the cooked chicken and egg mixture to the bowl of rice.
- Mitsuba is hard to find where I live, so I usually just garnished with green onions.
- I used an onsen tamago maker to prepare the eggs, alternatively you can soft boil or just use a raw egg yolk to finish the dish.
- I’ve provided suggestions of Optional Add-Ins if you are looking for additional vegetables and ingredients to add in. Feel free to add other ingredients to your liking.
- To make this recipe Gluten Free, substitute regular soy sauce with gluten free soy sauce.